When I hosted my DisneySide at Home Celebration Party, I knew that I wanted to create a photo booth and props. I found all kinds of really cute little printables, but I was less than thrilled with the idea of holding up printed things. It probably wouldn’t have bothered anyone else, but it just wasn’t for me.
Then one day, inspiration struck. I found a precious Mickey Mouse silhouette that was being used for a hair bow giveaway. Yes, inspiration comes in many forms and from many places.
Then began the hunt for supplies to make my own Mickey and Minnie Mouse Photo Booth and Props. I didn’t have anything particular in mind when I set about on this quest, I just knew that it would jump at me when inspiration struck. I went to Walmart (the ONLY source of craft supplies in my town) to search for the rings used in floral arrangements. Walmart had none. I called local flower shops, who told me they special order them as needed. I tried local buying and selling groups, but no luck there either.
I had more luck shopping at Goodwill, another local thrift Shop, and in my own house than I did anywhere else. I also used nontraditional supplies to make it work. I found a red throw blanket and paid $1 for it. It worked great for the background. I also bought a few other things there like a sheet and pillowcases that I planned to use to create a larger banner, but ran out of time. With the prices I paid, I had no regrets when those materials weren’t used.

Mickey Mouse Photo Booth and Props Supplies

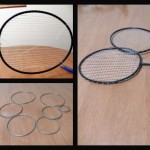
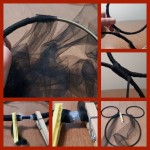
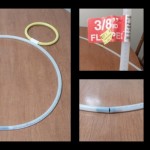
At Goodwill, I found a couple of pieces of 3/8″ plastic tubing. I’m pretty sure it’s the kind used for refrigerator ice makers. I paid $1 for each piece of tubing. The pink and yellow circles were things in my daughter’s sports equipment in the garage. We’ve had them for several years for a ring toss, but I think they are actually pool toys. I selected them because they were similarly sized to the 3/8″ tubing. I didn’t have to find anything special to hold them together. I broke a pencil and stuck it into the openings.
 Mickey Mouse Photo Booth and Props Supplies
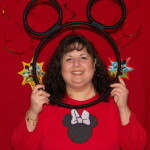
During the same trip to Goodwill, I picked up a couple of Badminton racquets. I thought they were perfect for the little kids to hold up in front of them, once I attached some ears. I had a couple of brass rings at home that were perfect for the ears. But I was planning to make three of these racquets and needed more. A stop at the local Good Samaritan Thrift Store supplied me with more rings. I think it might have been a napkin holder, but it really doesn’t matter. Whatever that thing was in the first two pictures in the bottom left supplied me with three pairs of ears. All I had to do was pull the rings downward and they popped apart. I paid a whole whopping $0.25 for the napkin holder and $1 for each of the racquets.
 How to Make a Mickey Mouse Photo Booth and Props
I bought a bag of 1/2″ black ribbon lanyards at one of the thrift shops. It didn’t work because it wouldn’t lay smoothly on the small metal rings. I also bought a couple of rolls of black tulle to cover everything. It worked well because it easily took on the shape of the rings.
How to Make a Mickey Mouse Photo Frame Prop Using Tubing:
- Cut the tubing to desired size using a hacksaw or miter saw and box.
- Break or sharpen a pencil to around 4″ in length.
- Place the pencil in one end of the tubing.
- Pull the other end of the tubing into a circular shape.
- Feed the pencil into the open end of the tubing to close the circle.
- Hot glue can get squirted between the open ends of the tubing to help secure the shape. Hot glue can also be smeared around the seam on the outside of the tubing for extra security.
- Follow the rest of the directions below.
How to Make a Mickey Mouse Photo Frame Prop Using Rings and Racquets:
- Pull 2 to 3 arm lengths of the tulle from the bolt and cut.
- Wrap tulle around each ring to be used as an ear. Tulle can be spread out, bunched, or twisted as it is wrapped around. The starting end of the tulle can be taped, hot glued, or held and wrapped into place with the tulle.
- Once the entire ear has been wrapped in tulle, position it as desired around the large tubing circle or racquet.
- Wrap the tulle TIGHTLY around the racquet or larger tube and continue wrapping until the ear is securely wrapped in place.
- Continue wrapping the tulle around the larger frame until all tulle is used.
- Clip the end of tulle in place with a clothespin until ready to hot glue the ends down.
- Repeat steps 1-6 until both ears are secured t the main frame and all surfaces are well covered with tulle.
- Hot glue all tulle to the back side.
- Trim ends of tulle as needed to hide the ends.
- Want to make a Minnie? Just add a bow between the ears. The ears on my photo frame were close enough together that the bow was simply pushed into place between the ears.
How to Make a Mickey Mouse Photo Booth:
- Determine the location for your photo booth. We chose our garage, specifically the garage door. I have a small home and this provided us the largest wall space for the photo booth.
- Determine your setup – think about lighting, colors, available decorations in your home that go with the color scheme.
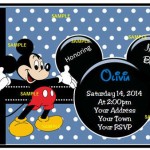
- Party invitations provide lots of ideas on how to create a theme backdrop for photo booths like Mickey Mouse Clubhouse. This is the one I had planned to make before I ran out of time. I wasn’t going to add the Mickey, but had planned to do something similar. Remember those pillowcases I said I bought at Goodwill? Cheaper than buying large rolls of paper or fabric.

- Hang a back drop. Mine was a red throw blanket I bought for $1 at Goodwill.
- Hang your desired decorations on the back drop. Mine were dangling Mickey Mouse Clubhouse banner decorations. Get creative cut out some decorations from construction paper, felt, or foam.
- Don’t worry about it being perfect. It’s easy to crop and edit pictures these days.
- Think about people of different heights. Do you have chairs available for people to set if needed? Our backdrop was too low for some people, so we asked them to sit in chairs. Later on, we raised and lowered the garage door to the height that worked best for those in the pictures.
- When it’s all finished, sit back, enjoy, and snap, snap, snap away!

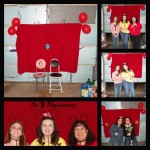
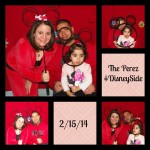
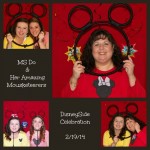
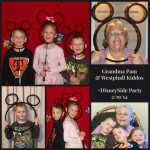
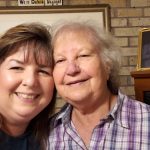
These are some collages I made from party-goers at our DisneySide at Home Celebration. Can you tell that we had lots of fun? Click on the images to enlarge.


This is a really cute idea. Great for parties
Thanks! We had lots of fun with them. 🙂