
Thanks to Good Cook, I received a whole box of goodies to well stock a Halloween Party. While we’re not big on the Halloween thing around our house, but we love experimenting with new products and trying new techniques. Let me tell you, this Haunted House project certainly gave me a workout!
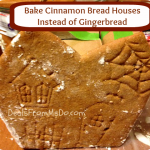
The 7 Piece Haunted House Cutter Set came with a recipe to make GingerBOO. I had most of the ingredients and decided to sub the others. I had no ginger, it’s something I just don’t use, so I skipped it and doubled up on the cinnamon. The recipe also called for molasses. Considering I’ve never had a need for molasses, I had no desire to run out and buy any either. Instead, I used dark Karo syrup and added extra brown sugar to make it thicker like molasses. The recipe called for 1/3 cup of molasses, so I used 1/3 cup of the Karo and brown sugar. The recipe also called for unsalted butter, I only buy salted and used what I had there. Too bad I didn’t think about deleting the salt called for in the recipe. They were really good, just a tad salty. Because my cinnamon was old, I decided to triple the amount in the recipe. Again, this didn’t create a problem, it gave the cookies I made with the left over dough the perfect flavor. Besides, I knew it would contribute to the brown color that was missing since I didn’t use the molasses.
If you learn nothing else from this post, remember to READ THE DIRECTIONS FIRST! Like the do do bird that I can be at times, I measured all of my ingredients out and proceeded to dump them into one big bowl. Good thing I started reading the directions because I was able to salvage the recipe I was about to ruin, especially considering I was making a double batch! The directions said to put certain ingredients into a pan on top of the stove. OOPS! I dug out what I could and proceeded with caution. Luckily, I started reading directions at JUST the point of return. Anyone else ever make mistakes like that?
 Turn dough ball onto waxed paper and lightly flour to roll.
After I got back on the right track, I was able to form the ingredients into a dough and the ball that forms when you’re making this kind of stuff. The directions on the box recommended rolling the dough out to 1/8″ thick. If you’ve ever rolled dough before, you know it’s nearly impossible to make sure dough is rolled the correct thickness throughout. It is extremely easy to roll it thicker in some spots than it is in others. Long, long ago, I some how learned to use wooden boards of the same height to make sure my dough was rolled to the correct height. These are just wooden boards I bought at Lowe’s for another project and they served a dual purpose for this one. Wipe down with a soapy sponge when finished and store for the next use.

Roll Dough with Wooden Slats to Maintain Level Height
The dough needs to be turned each direction so that it is stretched evenly when rolling. I was a bit surprised at how smooth the rolled dough felt. It was almost glassy feeling. My daughter thought it felt more like the smooth finish of our dining room table. The directions recommended rolling out on a silicone baking mat. I don’t have one, so I used wax paper instead.
 The Haunted House Cutter Set makes cutting pieces a breeze!

After rolling out the dough, I used the 7 Piece Haunted House Cutter Set to cut my house pieces from the dough. I used wax paper to roll the dough out, so I was able to later transfer my entire cut out directly to my baking sheet. After cutting out the front and back of the house, the excess dough was thrown back into the bowl. Even though I cut them close together on the dough, I used scissors to cut the wax paper apart before putting them on the baking sheet to allow them plenty of room to expand when cooking.
The Haunted House Cutter Set pieces are double sided
Each of the cutter pieces serve dual purposes. After using one side to cut out the pieces, you simply flip the cutter over use it as a stamp to emboss the design into each piece. My only fault with this concept was that the orange (front and back) cutter didn’t match up when flipped over. One of the roof peaks is higher on the left than the right, but when flipped it becomes the opposite. I had a hard time lining up the spider web with the rest of the design because of this. I absolutely LOVED the handles on the sides, though. It made moving the cutters around a lot easier and lifting them up when I was done cutting out each piece.

Super Detailed Imprints on the Haunted House Pieces
The sides of the house were super cute after being embossed with the cutter. These pieces lined up really well since they were just simple rectangle shapes. Unfortunately, most of these details were hard to clearly see once they were baked. They just seemed to cook back together with minor outlines of what I stamped into the dough. The edges also rounded. I’ve never made anything like this before, so I’m not sure if it was me, my recipe modifications, or the cutter design.
 Haunted House Assembly Dos and Don’ts
After the pieces were cut, they were baked, cooled, and ready for the building phase to begin. With the house front and back tapering toward the bottom, it made constructing the house VERY DIFFICULT! At one point, I had the house put together using royal icing. I didn’t even attempt to stand it upright, I laid it face down, added the sides, and then the back. I was SO EXCITED that it was put together and holding together, shocked might be a better description! The roof tops went together fairly easily because I formed them around the roof cutter. I used toothpicks to hold them at the proper angle and propped it up against a soda bottle to help hold them in place.
I let all the pieces dry and thought they were firmly set, then came the tragedy. I put the roof on and the house completely fell apart. MAJOR SAD FACE!
Then came hours upon hours of trying to get the thing put back together. NO, it would NOT go back together the same way I had put it together earlier. Next, I tried using toothpicks, like nails to hold the sides to the front and back. They went into the front just fine, but when I put the back on, they all ripped through. Another MAJOR SAD FACE! I gave up, went to bed, and tried again the next morning.
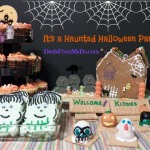
As you can see from the pictures, I did what I jokingly said I was going to do when this challenge was announced. I used the royal icing and stuck the pieces to a box! Actually, it was multiple small boxes that I had taped together. the box flaps were also taped upward to help support the roof tops. EUREKA! I had once again achieved success.
After getting the whole Haunted House put together, I propped it up with canned vegetables and soda bottles. I left it alone for at least six hours to make sure it had firmly set this time. I could NOT go through it all again. I really enjoyed decorating the house and the scene once the house was put together and standing. I’m all about the decorating, that’s a truly fun challenge that I enjoy because it allows my creative side to come through. Although I creeped the aisles at Walmart and Dollar Tree for over an hour, I ended up spending less than $5 to decorate the house. It would have been even less, but I felt guilty for not using more of the candy decorations that I had bought. 😉

Haunted House Cookie Cutter Set Final Result
This is not a kit that I would recommend as a first time project, but for a seasoned baker. In the end, was it all worth it? I’m still not 100% sure, but I do have to say that I am rather pleased that I pulled it together and pulled it off!
Like what you read about the 7 Piece Haunted House Cutter Set ? Goodcook is offering a 25% off coupon to goodcook.com for the Good Cook Popcorn Ballers. Use CODE: HAUNTED23


Great ideas! I love how you “improvise”.
You did a great job!
Thanks!
That turned out really cute! My kids love making gingerbread houses, although we’ve never tried to make the gingerbread before, we usually buy it premade.
Thanks! Trust me, premade would have been SOOOO much easier!!
Yes we have made them before but it was from the ones that are already made all we have to do is put it together. Nope just as long as my boys are having fun that is all that matters.
We love making gingerbread houses, to be truthful we tend to make a mess, it starts off all serious and generally ends up with us eating more frosting than decorating with it lol. No real tips, just have fun!
I have made several gingerbread houses with my wife. Our first one was hilarious! It was so messy but it tasted so good! 😉
This turned out cute even if it was a pain. The only real tip I have for decorating cookie houses is to make sure you are well assembled and dry before you start trying to decorate… make sure your cookie dough is a very dry batter more moisture= more breakage.
I love the gingerbread houses. I’ve never made one. The one above would be great to try! I don’t have any tips to share yet.